Overview:
The integration with OKta, allows our customers to manage users for moovingon.ai from one place. For more details on moovingon.ai please contact sales@moovingon.com .
Definitions:
Identity Provider – A service that provide Identity management. In our case, it will be Okta.
iDP-initiated SSO – Identity Provider Initiated SSO, it’s type of SSO that being initiated from identity provider(which is Okta in this case).
Notes:
- WARNING: Don’t try to enable SCIM before you verified that IdP is working. you can potentially be locked outside of the app.
- For iDP-initiated SSO, the account in MoovingON AI and the account in Okta Application Domain should share the same Email Address.
- iDP-initiated SSO won’t work if the user in okta doesn’t have a user in MoovingON AI. (Error 405)
[Precondition] Create Okta application:
First, we will have to create a new Okta Application.
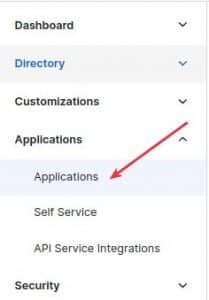
1. On Okta, we’ll click on Applications >> Applications:
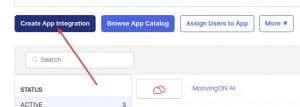
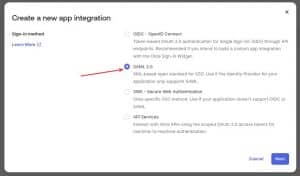
3. Click on SAML 2.0 and then Next.
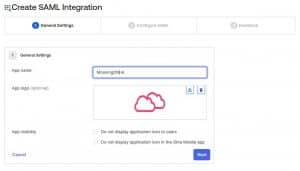
4. Now we’ll Add the following fields: App name: MoovingON AI App Logo:

Right click to save it.
5. Create SAML integration., see image and afterwards click on
6. Fill the following fields:
Single sign-on URL: https:///sso/acs/
Audience URL (SP Entity ID) or Audience Restriction:
https:///sso/acs/ (could be anything)
Default RelayState: <the same unique_identifer from audience URL>
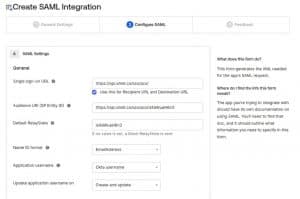
6. On Attribute Statements, Fill the following and click NEXT
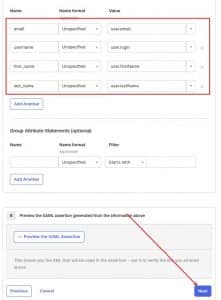
7. Now that we have an app, we can use it to add it to MoovingON AI.
Okta IdP-Initiated SSO:
1. On MoovingON AI, navigate to Settings >> Integrations
2. On Add Integration, search for Okta and click on Add Okta
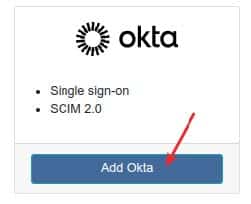
3. Now, we’ll enter the same Entity ID that we set during the creation of the Okta Application

4. To get the Metadata, we will go to the MoovingON AI Okta Application, switch to the Sign On tab and under SAML 2.0, We’ll see Metadata URL. Click the Copy button to copy it
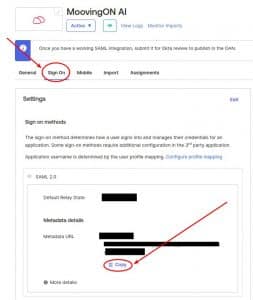
5. We’ll enter the Metadata inside the field and leave SCIM 2.0 disabled.(It’s important to verify that we can use Okta to login before we enable SCIM 2.0 as it can lock us outside of the app)

6. Click Submit and we are Done
7. To verify functionality, login to the Okta Application Domain we used to create the application and go to the End User Dashboard.
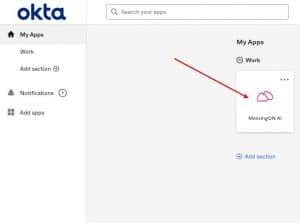
Note: If the application is not appear on the screen, it means that the user is not assigned to the app.
8. Click on MoovingON AI. The Application will open without any need for a password
Add Okta SCIM Integration:
1. On Okta Application Domain, go to General >> App Settings and click on Edit
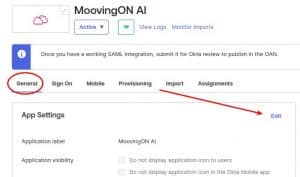
2. On Provisioning mark the checkbox for Enable
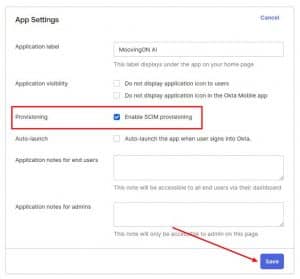
3. Now we’ll go to the Provisioning tab and click on Edit.

4. And we’ll fill the fields:
SCIM connector base URL: https:///api/scim/v2
Unique identifier field for users: email
Supported provisioning actions:
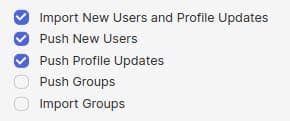
5. Now also need to fill these: Basic Auth:
Username:
Password:
6. to do that, we’ll go to MoovingON AI, select the Okta integration we want to use and enable the System for Cross-domain Identity Management (SCIM 2.0) option:
7. Now we’ll click on the edit button of that Okta Integration to get the credentials:

8. and then click submit:
9. Back on Provisioning page on the Okta Application Domain, we will click on Save.
10. Now we’ll click on the edit button of that Okta Integration to get the credentials:
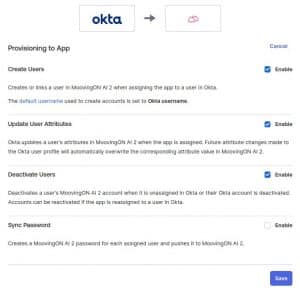
11. and click on Save
12. Now we’ll scroll down and click on Profile Editor (make sure you still under Okta to App)
13. Click on Add Attribute and fill the following:
Data Type: boolean
Display name: moovingon_ai_admin
Variable name: moovingon_ai_admin
External name: moovingon_ai_admin
External namespace: urn:ietf:params:scim:schemas:core:2.0:User
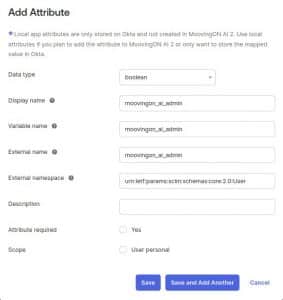
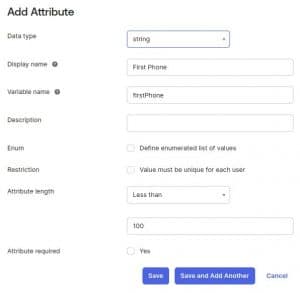
14. Now we’ll do it again for 2 more attributes:
Data Type: string Display name: First Phone
Variable name: firstPhone
External name: firstPhone
External namespace: urn:ietf:params:scim:schemas:core:2.0:User
Attribute length: Less than 100
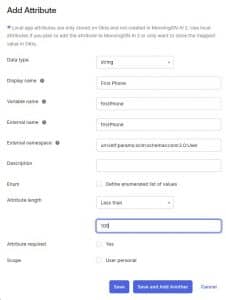
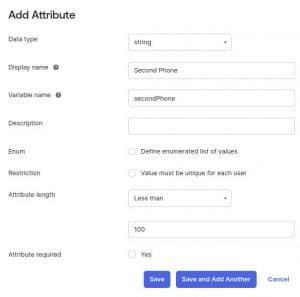
And..
Data Type: string
Display name: Second Phone
Variable name: secondPhone
External name: secondPhone
External namespace: urn:ietf:params:
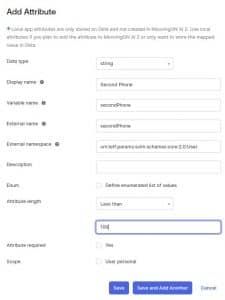
15. Now, we will click on the Mappings button. (make sure you still under Okta to App)
16. Change the following values depends if you want each user to set his phone for himself (recommended)


It’s important to mention that every phone number should start with a ‘+’ and a country code. ex. ‘+972..’
17. We’ll change the menu to To Okta and scroll down to Profile Editor
18. Now we’ll click on Add Attribute to add First Phone and Second Phone
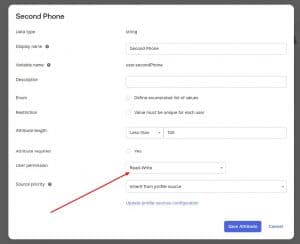
19. We’ll go back to To Okta menu, scroll down to Okta Attribute Mappings and we’ll set First Phone and Second Phone to have User Permissions set to Read-Write and click Save Attribute.
Add a MoovingON AI Administrator group:
1. On Assignments tab click on Assign and click again on Assign to Groups
2. Select the group you wish to add an Administrator group and click Done.
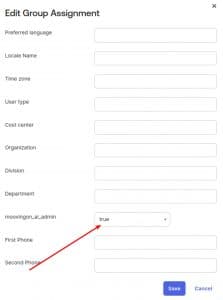
3.Then click on the Edit button and set moovingon_ai_admin to true and then click Save
FAQ:
Q1: What is SCIM, and why is it important to verify IdP functionality before enabling it?
A1: SCIM, which stands for System for Cross-domain Identity Management, is a standardized protocol for the exchange of user identity information between identity providers (IdPs) and service providers. Verifying IdP functionality before enabling SCIM is crucial to avoid potential lockout from the application. This preliminary validation ensures a seamless integration, preventing disruptions in user access and maintaining the security and efficiency of the identity management system.
Q2: Can IdP-initiated SSO function if the user in Okta lacks an account in MoovingON AI?
A2: No, IdP-initiated Single Sign-On (SSO) will not work if the user in Okta does not have an account in MoovingON AI. To have this functionlity, we need to add SCIM Provisioning.
Q3: How can I verify the functionality of Okta IdP-Initiated SSO?
A3: Log in to the Okta Application Domain, go to the End User Dashboard, and click on MoovingON AI. If the application doesn’t appear, check if the user is assigned to the app.
Services
Platform
Partners
About Us